Digital & Embedded Systems
Tutorial 8 - PSD and Electromagnet Interfacing
PSD Sensor Calibration
The Eyebot can use Sharp GP2D02 infrared position sensing device (PSD) to measure the distance between the PSD and an object. The data sheet for the GP2D02 can be found here. (Click on Controller -> Controller -> Hardware -> Data Sheets)
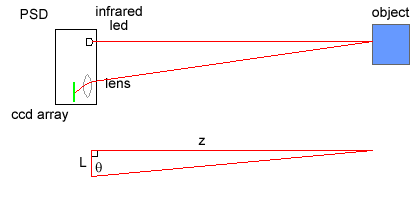
The GP2D02 uses the principle of triangulation to estimate distance. An infrared LED emits a narrow directional beam of light. When the infrared beam contacts an object, a portion of the light is absorbed, a portion is scattered and a portion is reflected back towards the PSD. The light that is reflected back to the PSD is collected through a lens and focused on a linear CCD (charge-coupled device) array. The position of the infrared light on the CCD array determines the distance to the object.
This method of range estimation is useful because it is not affected by ambient light and is relatively indifferent to the color of the object being detected.
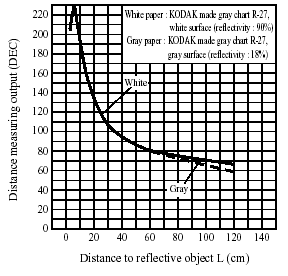
Figure 1 - PSD Output vs. Object Distance
Figure 1 was taken from the sensor data sheet. Notice that the PSD has a non-linear output as a function of the distance to the object. Plus, due to inconsistancies in manufacturing of the sensors, different PSDs will give different 8-bit values for the same distance measurement. This can cause confusion when using the PSDs for obstacle avoidance. Therefore, each PSD must be calibrated to some base scale.
Figure 2 - PSD Geometry
Problem: Different sensors give different readings for same distance value.
Solution: Calibrate PSD sensors in a desired range so that each PSD gives equal values for equal distance measurements. Note that the units of distance (millimeters, inches, etc.) are arbitrary, but they must remain consistant throughout the calibration routine.
Step 1: Build a model
From the figure above, the relationship between the reflection angle and the distance to the object is
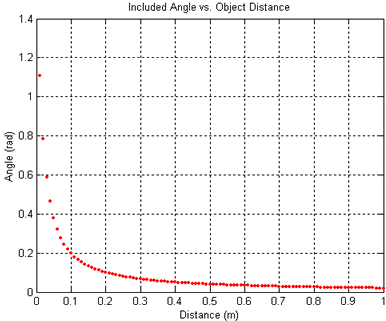
The data sheet specifies the distance between the lens and the LED to be 0.02 meters. From Figure 1, we can also deduce that reasonable range for Z is between 0.1 to 1.0 meters. An ideal plot of the angle versus the distance to the object is
Figure 3 - Included Angle vs. Distance for Ideal PSD
One should observe that this curve has the same characteristics as the curve in Figure 1, however the scaling does not agree.
Step 2: Construct Experiment
The after the mathematical model is derived, the next step is constructing our calibration experiment. When calibrating a sensor, one must determine the range in which the sensor should measure. The PSD sensors aren't accurate at distances closer than approximately 10 cm, therefore this would be an appropriate bottom range. The PSD sensors are quoted to work at a distance of up to 100 cm, so this would be an appropriate upper range. One must also decide the number of intermediate samples to observe, for this experiment a suitable number would be to sample every 10 cm.
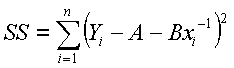
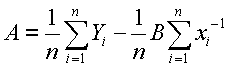
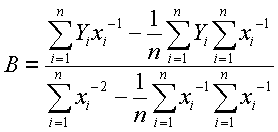
The output relationship of the PSD sensor can be written as
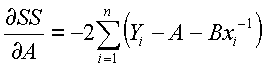
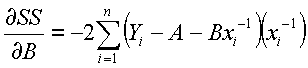
where alpha and beta are the regression coefficients. These values are unknown, but can be estimated from experimental data. A suitable method to estimate the values for coefficients is the method of least squares. The method of least squares finds estimators A and B that minimize the sum of the squared differences between the actual data and the estimated response. The sum of the squared differences, SS is given by the equation
Differentiating with respect to A and B yields
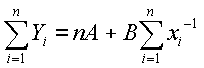
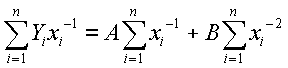
By equating the above partial differential equations to zero, the following equations can be obtained.
Now rearrange the first equation in terms of A and substitute into the second. This yields
By rearranging the second equation, the parameter B can be found. Once B has been calculated, it can be substituted into the first equation to calculated A.
Step 3: Conduct Experiment
Table 1 - Sample PSD Data
From the data shown in Table 1, the estimators for the regression parameters are
A = 76.5
B = 14.8Figure 4 shows the sample data points along with the plot of theoretical values.
Figure 4 - Experimental and Theoretical Results
Step 4: Implementation (Function vs. Look-up Table)
Now a function has been found that relates the output of the PSD to the distance to an object. This function will be useful in determining the distance to an object and can be used for avoidance. If the PSD readings are taken often, this means that the calculation will have to also be done quite often. An alternative to computing a value each time you sample the data is to precalculate all possible values and store them in an array, often called a look-up table. This file demonstrates how to compare the computational speed of each method. One should be aware that this program only provides a rough approximation of the execution times of each function call and the output will also depend on the other processes the computer is currently running. Convert the file so it can be executed on an Eyebot and test the times of each.